Siding Material Installation Guide A Comprehensive Overview
Siding material installation guide provides a thorough and practical approach to transforming your home’s exterior. From understanding the various siding materials—vinyl, wood, and fiber cement—to mastering installation techniques, this guide offers a complete toolkit for successful projects. We’ll cover everything from meticulous planning and preparation to executing flawless installations and achieving a beautiful, long-lasting finish.
This guide walks you through the critical steps of planning, preparing, and installing siding, equipping you with the knowledge and confidence to tackle this significant home improvement project. It covers everything from choosing the right materials to executing the installation procedures, and also offers helpful advice on finishing touches, maintenance, and troubleshooting potential issues.
Introduction to Siding Material Installation
Siding materials are exterior coverings for walls of buildings. They protect the structure from the elements, enhance its aesthetic appeal, and increase its overall value. Proper installation is crucial for long-term performance and protection. Different siding types offer varying levels of durability, maintenance requirements, and aesthetic possibilities.
Siding Material Types
Siding materials are categorized into several types, each with unique characteristics. Understanding these differences is essential for selecting the appropriate material for a specific project. Common types include vinyl, wood, fiber cement, and metal.
Vinyl Siding
Vinyl siding is a popular choice due to its affordability, low maintenance, and resistance to rot, insects, and decay. Its versatility allows for a variety of colors and textures to match diverse architectural styles. Installation typically involves attaching panels directly to the wall framing. Common installation methods include using clips or nailing, with specific methods varying depending on the manufacturer’s guidelines.
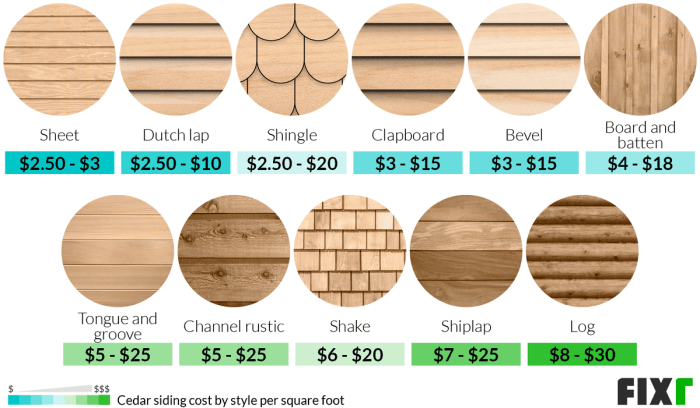
Wood Siding
Wood siding offers a classic, natural aesthetic. However, it requires regular maintenance to prevent decay and insect infestations. Different types of wood siding exist, each with its own properties and installation needs. Properly treated lumber can extend the lifespan of the siding, but it still demands more upkeep than vinyl or fiber cement. Installation typically involves nailing or screwing the boards directly to the wall framing.
Fiber Cement Siding
Fiber cement siding is a durable and long-lasting option, providing a strong, weather-resistant exterior. It’s designed to resist rot, insects, and fire. Fiber cement siding is often chosen for its resemblance to natural wood while offering better resistance to the elements. Installation procedures are similar to wood siding, involving nailing or screwing the panels to the wall framing.
Metal Siding
Metal siding, often made of steel or aluminum, is known for its durability and weather resistance. Its high resistance to dents and impact damage makes it a preferred choice for high-traffic areas. Installation often involves attaching the metal panels to the wall framing with specialized fasteners.
Comparison of Siding Materials, Siding Material Installation Guide
| Siding Material | Pros | Cons | Installation Method |
|---|---|---|---|
| Vinyl | Low maintenance, affordable, resistant to rot and insects, diverse colors and textures, easy to install. | Can be prone to damage from impact, may not have the same aesthetic appeal as other materials, can be less durable in extreme weather conditions. | Panel attachment to wall framing using clips or nailing, following the manufacturer’s guidelines. |
| Wood | Classic aesthetic, natural look, relatively easy to install for some types. | Requires regular maintenance (painting, sealing) to prevent decay and insect infestations, susceptible to weather damage, more expensive than vinyl in the long run. | Nailing or screwing boards directly to wall framing, ensuring proper spacing and support. |
| Fiber Cement | Durable, long-lasting, resistant to rot, insects, and fire, low maintenance, good aesthetic appearance. | It can be heavier than other materials, installation may be more complex than vinyl or wood, higher initial cost. | Nailing or screwing panels to wall framing, ensuring proper support and alignment. |
| Metal | Extremely durable, resistant to dents and impact damage, high weather resistance, and long lifespan. | Can be more expensive than other materials, can be more challenging to install, potential for noise issues in some climates. | Attaching metal panels to wall framing with specialized fasteners, often requiring additional support structures. |
Planning and Preparation
Proper planning is crucial for a successful siding installation project. Thorough preparation minimizes potential issues and ensures the job is completed efficiently and safely. This involves meticulous site preparation, tool and material gathering, accurate measurements, and a robust safety plan. A well-defined project plan will help manage the project from start to finish.
Site Preparation
Preparing the site for siding installation is paramount. This involves removing existing siding, cleaning the surface, and ensuring the underlying structure is sound. Thorough site preparation prevents issues later on in the project, such as water damage or structural problems. Uneven or damaged surfaces can lead to improper siding installation, compromising the longevity and aesthetics of the project. The foundation, walls, and roof must be inspected for any defects that could compromise the structural integrity or cause future problems.
- Remove old siding, ensuring all nails and debris are cleared. This step prevents the old siding from interfering with the new installation and ensures a clean and stable surface for the new material.
- Clean the surface thoroughly, removing any dirt, debris, or loose materials. A clean surface provides better adhesion for the new siding, improving its longevity.
- Inspect the underlying structure for any damage or rot. Repair or replace any damaged components to ensure the new siding is installed on a stable and sound structure. Addressing these issues upfront saves significant time and money in the long run.
- Ensure proper drainage around the house. This step prevents water damage and ensures the longevity of the new siding.
Tools and Materials Checklist
A well-organized checklist ensures all necessary tools and materials are readily available. A meticulous inventory of required materials will prevent delays and unexpected expenses during the installation process. This includes not only the siding itself but also fasteners, caulk, and other necessary components.
- Siding material (e.g., vinyl, fiber cement, wood)
- Fasteners (e.g., nails, screws, anchors)
- Caulk
- Sealant
- Measuring tape
- Level
- Drill and drill bits
- Utility knife
- Safety glasses
- Gloves
- Ladder
- Safety harness (if working at height)
- Pencil
- Chalk line
Accurate Measurements and Diagrams
Accurate measurements are essential for precise installation. Measurement errors can lead to wasted material, improper fitting, and aesthetic issues. Detailed diagrams, including cut lines and installation patterns, significantly streamline the process. These diagrams should be clear, precise, and easily understandable. These diagrams are crucial for ensuring that all siding pieces fit together correctly.
- Take precise measurements of the area to be sided.
- Create detailed diagrams or blueprints showing the siding layout and dimensions.
- Use a measuring tape for accurate measurements.
- Use a level to ensure that the siding is installed at the correct angle.
Safety Precautions
Safety is paramount during siding installation. Working at heights necessitates precautions to prevent falls. Proper safety equipment, including harnesses and ladders, should be used. Protective gear, such as safety glasses and gloves, is essential to prevent injuries.
- Wear appropriate safety gear, such as safety glasses, gloves, and a hard hat.
- Use ladders and scaffolding safely, following manufacturer guidelines.
- If working at heights, use a safety harness and fall arrest system.
- Inspect all tools and equipment before use.
- Be aware of potential hazards, such as falling objects or electrical wires.
Project Plan
A detailed project plan articulates the steps involved in siding installation. It should include timelines, task assignments, and contingency plans. A project plan helps ensure that the project is completed on time and within budget.
- Define project scope and objectives.
- Establish timelines and deadlines for each task.
- Assign responsibilities to team members.
- Identify potential risks and develop contingency plans.
- Artikel a budgeting and tracking expenses.
Tools for Siding Installation
A comprehensive understanding of the tools used in siding installation is critical for efficiency and accuracy. Different tools serve distinct purposes, ensuring a smooth and precise installation.
| Tool | Function | Image Description |
|---|---|---|
| Measuring Tape | Precisely measures dimensions for accurate cutting and installation. | A flexible measuring tape with a metal or plastic tape measure. |
| Drill | Drives screws and fasteners into the wall or framing for siding attachment. | A power drill with different drill bits. |
| Utility Knife | Cuts siding materials, such as vinyl or fiber cement. | A utility knife with a replaceable blade. |
| Level | Ensures siding is installed straight and even. | A carpenter’s level with a bubble. |
Installation Procedures
Installing siding correctly is crucial for a lasting and aesthetically pleasing result. Proper installation methods prevent future issues like leaks, rot, and premature siding failure. Adhering to these procedures ensures a robust and well-maintained exterior.
Careful adherence to the manufacturer’s instructions is paramount for optimal results. This section details the essential steps, from securing the siding to sealing gaps and joints. Understanding the various fastening techniques and potential pitfalls will allow for a smooth and successful installation.
Siding Installation on a Wall
The process begins with meticulous preparation of the wall. Ensure the wall is clean, dry, and free of debris. This will create a solid foundation for the siding. A properly prepared wall significantly reduces the risk of installation issues later on.
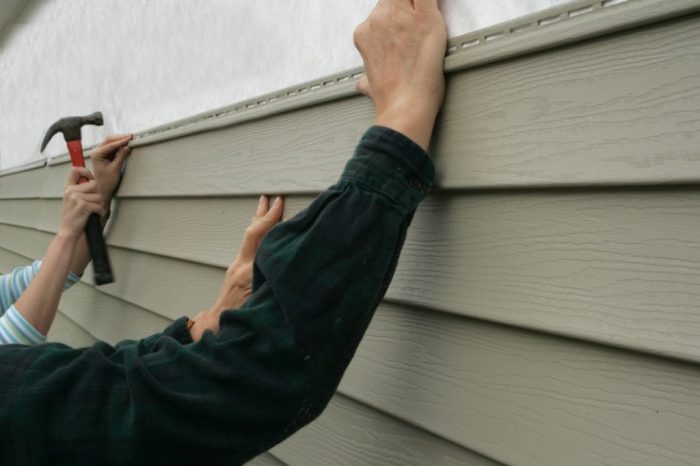
Securing the Siding to the Wall
Proper fastening is critical for the longevity of the siding. The specific method depends on the type of siding material. Always use the recommended fasteners, typically nails or screws, for the siding material and wall type. Using the correct fasteners ensures that the siding is held securely without damage. For example, using galvanized nails for wood siding will help prevent rusting.
Common Installation Errors and Avoidance
Several common errors can compromise the quality of the siding installation. One such error is using inadequate fasteners or applying them incorrectly. Another mistake is failing to account for expansion and contraction of the material due to weather changes. Using incorrect fasteners, neglecting expansion/contraction allowances, and insufficient caulking are common issues. Proper fastener selection and spacing, consideration of material expansion, and thorough sealing of gaps are crucial for preventing future issues.
Fastening Techniques for Various Siding Materials
Different siding materials necessitate unique fastening techniques. Wood siding typically uses nails, while vinyl siding often uses screws. Metal siding might use specialized screws or clips. Adhering to the specific instructions for each siding type is essential for optimal performance.
Different siding materials require different fastening techniques. For example, wood siding usually needs nails, while vinyl siding often benefits from screws for a strong hold.
Proper Sealing of Gaps and Joints
Sealing gaps and joints is vital to prevent water intrusion and air leakage. This step often involves using caulking or sealant. Thorough sealing is critical for maintaining the structural integrity of the siding and preventing moisture damage. Proper sealing also enhances the aesthetic appeal of the exterior.
Materials Needed for Sealing
A variety of materials are used for sealing gaps and joints. These include:
- Caulking
- Sealant
- Caulk gun
- Putty knives
- Painters tape
These materials are necessary for creating a watertight seal.
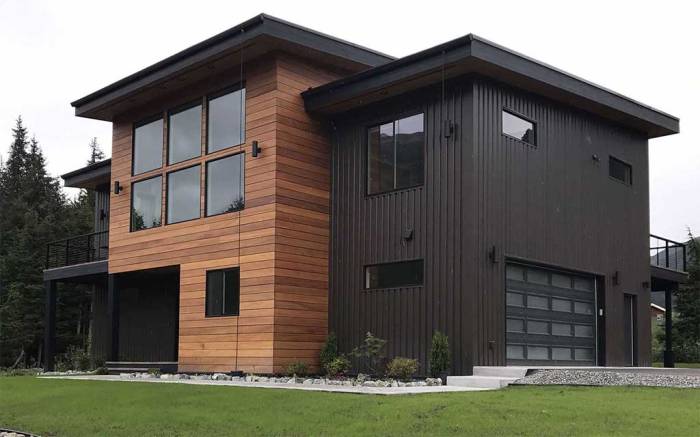
Finishing Touches and Maintenance: Siding Material Installation Guide
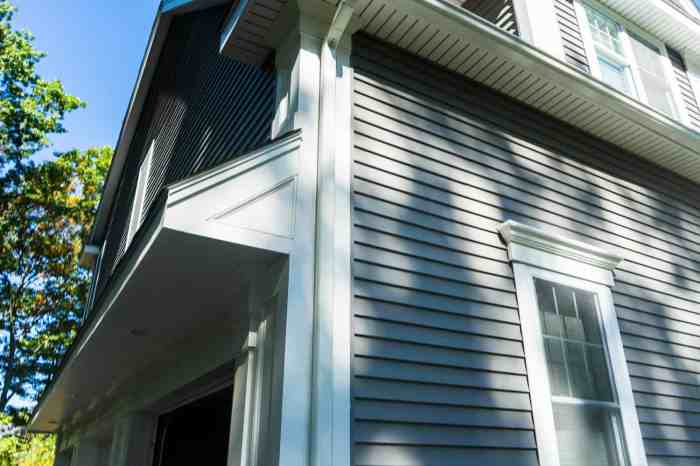
Source: archexteriors.com
Completing your siding project with a professional finish is crucial for longevity and curb appeal. Proper painting or staining, along with a consistent maintenance schedule, significantly extends the life of your siding and preserves its aesthetic value. This section details these essential final steps and provides guidance for ensuring your siding remains in top condition for years to come.
Importance of Proper Finishing
A well-finished siding project protects the material from the elements. Proper sealing and finishing, whether by painting or staining, create a barrier against moisture, UV rays, and other environmental factors. This significantly increases the lifespan of your siding, reducing the need for premature repairs and replacements.
Painting or Staining Siding (If Applicable)
For siding materials that require painting or staining, meticulous preparation is paramount. First, thoroughly clean the siding to remove any dirt, debris, or loose old paint. Then, ensure the surface is properly primed, following the manufacturer’s instructions. Applying multiple thin coats of paint or stain, allowing each coat to dry completely, is crucial for a durable and aesthetically pleasing finish. Using high-quality paints and stains specifically designed for exterior use will contribute to the long-term durability of your siding.
Importance of Regular Maintenance
Regular maintenance is key to preventing costly repairs and maintaining the beauty of your home’s siding. Prompt attention to potential issues often prevents small problems from escalating into significant ones.
Inspecting for Damage and Repair
Regular inspections are essential for identifying potential problems early. Look for signs of damage, such as cracks, gaps, or discoloration. Also, check for loose or missing fasteners. Minor issues can often be repaired quickly and easily, preventing further deterioration. If you identify damage that is beyond your capabilities, consult a qualified professional for repairs. Examples of damage include but are not limited to: warping, cracking, splitting, or significant mold or mildew growth.
Maintenance Schedules for Different Siding Types
A tailored maintenance schedule ensures optimal protection for different siding types. The following table provides a general guideline for maintenance frequency. Specific recommendations may vary depending on the local climate and environmental conditions.
| Siding Material | Maintenance Schedule |
|---|---|
| Vinyl | Visually inspect monthly for any signs of damage. Clean annually with mild detergent and water. Repaint every 5-7 years, or as needed. |
| Wood | Inspect biannually for damage, rot, or insect infestation. Clean annually with a mild detergent and water. Stain or paint every 2-3 years, or as needed. Regular sealing is crucial to prevent moisture penetration. |
Troubleshooting and FAQs
Successfully installing siding requires attention to detail and problem-solving. This section Artikels potential issues encountered during installation and provides practical solutions to address them effectively. Understanding common questions and their answers will empower you to confidently navigate any challenges that may arise.
Troubleshooting is an essential part of any construction project, particularly siding installation. By anticipating and resolving problems promptly, you can prevent costly rework, ensure a high-quality finish, and maintain a smooth workflow. This section provides comprehensive guidance on common issues and their solutions.
Potential Installation Problems
Addressing potential problems proactively is key to a successful siding installation. Careful planning and preparation minimize issues, while understanding solutions enables efficient problem-solving.
| Problem | Solution |
|---|---|
| Siding Gaps | Ensure proper nailing or fastening of siding pieces. Verify that the siding is correctly aligned with the framing. Check for adequate expansion gaps between siding panels. Incorrectly measured and cut pieces can also cause gaps. Using a specialized siding nailer can improve the quality of the fastening. |
| Siding Damage during Installation | Inspect siding for damage during installation. Carefully handle panels to prevent scratches or dents. Employ soft materials or protective coverings when moving siding. Ensure proper support to avoid pressure points. Use appropriate tools and techniques to prevent bending or breaking. |
| Improper Sealant Application | Use a high-quality sealant designed for exterior use. Ensure proper application, filling all gaps and seams. Sealant should be applied evenly and smoothly to prevent leakage or gaps. Clean the surface thoroughly before application. |
| Incorrect Framing | Verify that the framing is adequately supported and correctly aligned. Ensure proper nailing and bracing. Improperly installed framing can lead to sagging, cracking, and uneven siding. Consult building codes and guidelines to ensure proper framing for the specific type of siding material. |
| Uneven Siding | Ensure consistent measurements and cutting for each panel. Employ a level and plumb bob to maintain straight lines. Check the installation of the first few pieces to ensure consistency. Consider using specialized siding tools or techniques to maintain alignment. |
Frequently Asked Questions (FAQs)
Understanding common questions related to siding installation can help anticipate and address potential issues.
- How often should I inspect my siding? Regular inspections, at least twice a year, are recommended. This allows you to identify potential problems early and prevent costly repairs. Inspect for any signs of damage, such as cracks, gaps, or loose fasteners. Note that the frequency of inspections might vary depending on the climate and the type of siding material used.
- What are the best practices for storing siding materials? Proper storage is essential for maintaining the quality of siding materials. Store them in a dry, covered area, away from direct sunlight and moisture. Use protective coverings to prevent damage during transport and storage.
- What are the signs of moisture damage in siding? Look for signs of water stains, mold, or mildew. These can indicate moisture damage. Check for swelling or warping of the siding materials. Note that the specific signs might vary depending on the type of siding material and the climate.
Ultimate Conclusion
In conclusion, this comprehensive siding material installation guide provides a detailed roadmap to achieving a professional-looking exterior for your home. By following the steps Artikeld, you’ll gain a deeper understanding of each siding type, its installation methods, and the essential maintenance required for optimal longevity. This guide empowers you with the expertise to make informed decisions and execute the installation process with confidence, transforming your house into a stunning masterpiece.